
How a 12V Compressor Fridge Actually Works
You’ve seen those portable fridges that plug into your vehicle’s cigarette lighter and actually get things cold — not thermoelectric-cooler cold, but genuinely frosty. The secret isn’t magic. It’s a miniature vapor compression cycle running on 12V DC, and once you understand how it works, you can build one yourself.
Let’s break down the refrigeration cycle in plain language, then walk through a real DIY build using a BLDC compressor module.
The Vapor Compression Cycle at 12 Volts
Every fridge — from your kitchen unit to a portable 12V compressor fridge — uses the same thermodynamic trick. A refrigerant (typically R134a) circulates through four stages:
- Compression: The compressor squeezes low-pressure refrigerant vapor into high-pressure, high-temperature gas. In a 12V system, this is a brushless DC (BLDC) rotary compressor — no AC inverter needed.
- Condensation: The hot, pressurized gas flows through a condenser (a coil with fins), releasing heat to the surrounding air. The refrigerant condenses into a warm liquid.
- Expansion: The liquid passes through a capillary tube or expansion valve, dropping suddenly in pressure. This pressure drop causes the refrigerant to partially evaporate and get very cold.
- Evaporation: The cold refrigerant absorbs heat from inside your insulated box (the fridge cavity), evaporating fully back into a low-pressure gas. Then the cycle repeats.
That’s it. Four components, one closed loop, and your beer gets cold.
Why DC Changes the Game
Traditional household compressors run on AC mains power. They’re big, heavy, and start with a high inrush current that would murder a battery. A 12V DC compressor uses a brushless motor with a variable-speed driver board, which means:
- Soft start: No inrush current spike. The controller ramps up gradually, drawing maybe 2–4 amps at startup instead of 15+.
- Variable speed: The compressor adjusts RPM (typically 2,000–6,500 RPM) based on cooling demand. At steady state it barely sips power.
- Direct battery connection: No inverter losses. You run straight from a 12V battery, solar charge controller, or vehicle electrical system.
- Compact size: A miniature BLDC rotary compressor can be as small as 56.5 × 78 mm and weigh just 720g — smaller than a soda can.
Compressor Fridge vs. Thermoelectric (Peltier) Cooler
Before we build, let’s be clear about why compressor wins for a real fridge:
| Factor | Compressor | Peltier/TEC |
|---|---|---|
| Temperature delta | Can reach -20°C below ambient | ~20°C below ambient max |
| Efficiency (COP) | 1.5–3.0 | 0.3–0.6 |
| Power draw at steady state | Low (variable speed) | Constant high draw |
| Can freeze? | Yes | Rarely in practice |
| Noise | Low hum | Fan noise only |
A Peltier cooler is fine for keeping drinks cool on a short drive. For actual refrigeration — keeping food safe, freezing items, or running overnight off a battery — a compressor system is the only real option.
Planning Your DIY 12V Compressor Fridge Build
Now for the fun part. Here’s what you need to build a working 12V compressor fridge from scratch.
Core Components
1. DC Compressor Module
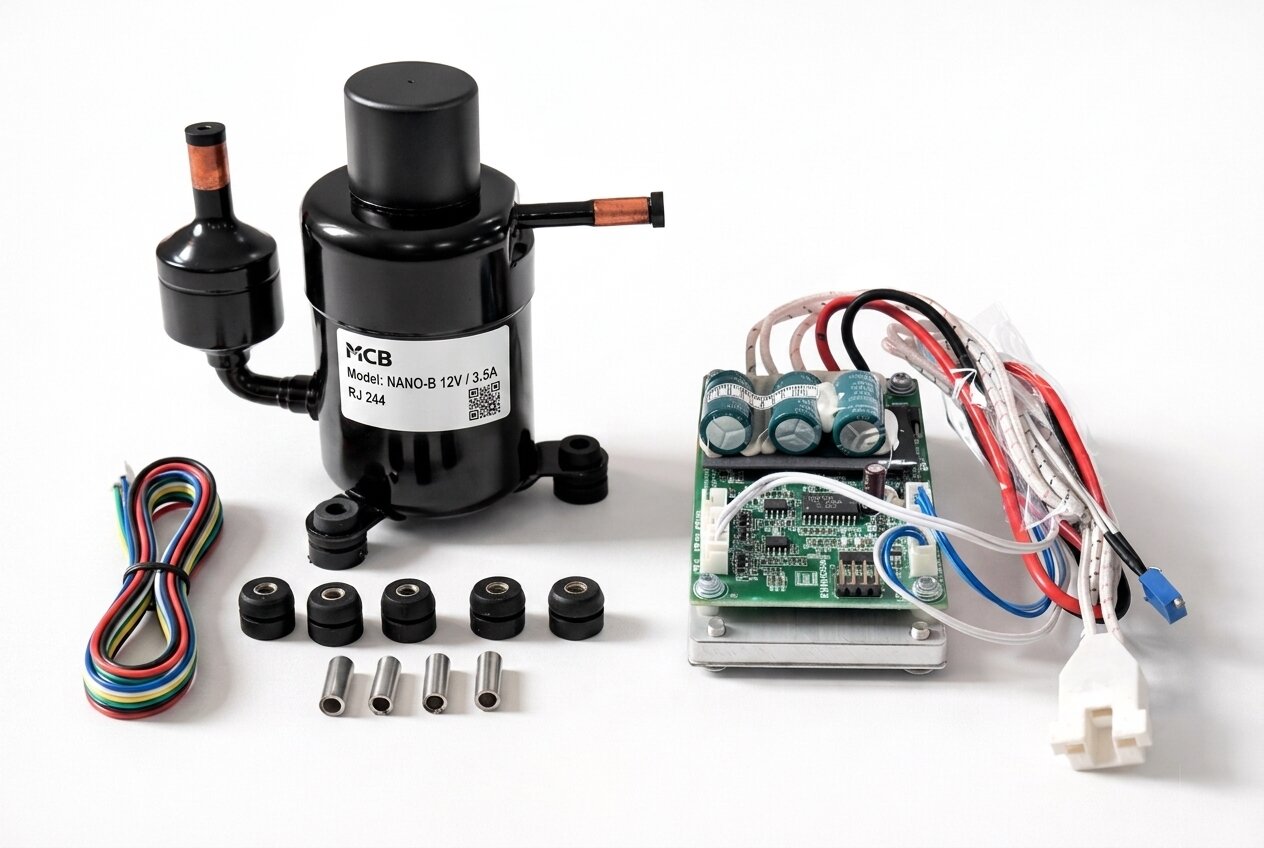
This is the heart of your build. You need a miniature BLDC rotary compressor rated for 12V DC with R134a refrigerant. The RIGID 12V mini compressor is purpose-built for this — it comes pre-charged with refrigerant and includes the variable-speed driver board, so you don’t need to source a separate controller or handle refrigerant charging yourself.
Key specs to look for in any 12V compressor:
- Voltage: 12V DC (confirm it’s truly DC-native, not AC with an adapter)
- Refrigerant: R134a pre-charged
- Motor type: BLDC with variable speed driver
- Cooling capacity: Match to your box size (more on this below)
2. Insulated Box
Your fridge is only as good as its insulation. Options:
- Repurpose a cooler: A quality rotomolded cooler (like a Yeti-style knockoff) with 2–3 inches of polyurethane foam works great. You’re already starting with good insulation and a gasket seal.
- Build from scratch: Use extruded polystyrene (XPS) foam board (R-5 per inch) or spray closed-cell polyurethane foam (R-6.5 per inch) inside a plywood or aluminum shell.
- Target: Minimum 50mm (2 inches) insulation on all sides for a fridge. For freezer applications, go 75–100mm.
3. Condenser
The condenser dumps heat from the refrigerant to the outside air. For a small fridge (20–60L):
- A finned tube condenser or wire-on-tube condenser roughly 200×200mm works
- Add a small 12V fan (40–80mm) for forced airflow — natural convection alone won’t cut it in an enclosed van
- Mount on the outside/back of your box where air can circulate freely
4. Evaporator
This is the cold side — a plate or coil that sits inside your box:
- An aluminum roll-bond evaporator plate is the easiest option for DIY. These are flat plates with internal channels for refrigerant flow.
- Size it to roughly match the back wall or bottom of your interior cavity
- Alternatively, wrap copper tubing (1/4″ OD) around an aluminum plate and bond with thermal epoxy
5. Capillary Tube
This tiny-diameter copper tube (typically 0.6–0.8mm ID, 1.5–3m long for R134a systems) acts as the expansion device. The length and diameter determine how much pressure drop occurs. For a pre-charged compressor system, this is often already sized and included.
6. Copper Tubing and Fittings
- 1/4″ OD copper tubing for suction line (low pressure, compressor inlet)
- 3/16″ OD copper tubing for liquid/discharge line (high pressure)
- Flare fittings or brazed connections
- A filter-drier on the liquid line (catches moisture and debris)
Electrical Components
- Wire: 14 AWG minimum for the compressor power leads (check your specific compressor’s max draw)
- Fuse: Inline blade fuse rated ~150% of compressor max current draw
- Thermostat/controller: A simple digital thermostat (like an STC-1000 or W1209 module) to cycle the compressor based on box temperature. Set it to cut in at your target temp + 2°C and cut out at target.
- Connectors: Anderson Powerpole or ring terminals for battery connection
Sizing: Matching Compressor to Box
This is where people go wrong. An undersized compressor won’t cool down; an oversized one short-cycles.
Rules of thumb for R134a systems at 12V:
- 20–40L box, fridge temps (2–8°C): A compressor with 100–200W cooling capacity is plenty
- 40–80L box, fridge temps: 200–350W cooling capacity
- Freezer applications (-15 to -20°C): You need more capacity due to the larger temperature differential. A 300–455W rated compressor for a 40L box
- Over 100L: Consider a 24V or 48V system for the additional capacity available
The RIGID QX1901VDL offers 100–455W of cooling capacity with variable speed — that range covers most DIY fridge builds from 20 to 80 liters depending on your target temperature.
The Build Process: Step by Step
Step 1: Prepare the Insulated Box
- Choose your box and plan where the evaporator plate will mount (usually the back wall or a shelf)
- Drill two holes through the insulation for refrigerant lines (suction and liquid). Make them as small as possible and seal with expanding foam after routing tubes.
- Plan a drain hole at the bottom — condensation will form on the evaporator and needs somewhere to go
- Route the thermostat probe inside, positioning it in the air stream (not touching the evaporator plate)
Step 2: Mount the Compressor and Condenser
- Mount the compressor externally on the back or bottom of the box using rubber vibration isolators. RIGID compressors come with anti-vibration cushions — use them. Direct-mounting creates an annoying buzz.
- Mount the condenser with its fan nearby, ensuring at least 50mm clearance from any wall for airflow
- Keep the compressor roughly level or slightly tilted — check manufacturer specs for maximum tilt angle
Step 3: Connect the Refrigerant Circuit
Important: If you’re using a pre-charged compressor system with factory-attached tubing and capillary, skip this step — just connect to your evaporator and condenser. If assembling from separate components:
- Connect compressor discharge (output) → condenser inlet
- Connect condenser outlet → filter-drier → capillary tube
- Connect capillary tube → evaporator inlet
- Connect evaporator outlet → compressor suction (input)
- Braze or flare all connections. Test for leaks with nitrogen pressure (150 PSI) and soap solution before charging.
Refrigerant charging: This is the hardest part for DIYers. Pre-charged systems eliminate this entirely — the compressor ships sealed with the correct R134a charge. If you must charge yourself, you’ll need a vacuum pump, manifold gauge set, and an R134a cylinder. Pull a vacuum to -29 inHg for 30 minutes, then charge by weight per the system spec. Under- or over-charging kills efficiency and can damage the compressor.
Step 4: Wiring
- Connect the compressor’s driver board to your 12V supply through a fuse
- Wire the thermostat relay in-line with the driver board’s power input, or use the driver board’s built-in temperature control if available
- Connect condenser fan to 12V (can run constantly or tie to compressor operation)
- Add a main power switch accessible from outside
- Double-check polarity — reverse voltage will damage the BLDC controller
Step 5: Testing and Tuning
- Power on with the box empty and open — listen for the compressor running smoothly
- Close the box and monitor temperature drop. You should see the interior drop noticeably within 15–20 minutes
- Check condenser: it should be warm/hot to touch. If it’s barely warm, something’s wrong with refrigerant flow.
- Check evaporator: should frost or sweat with condensation. Uneven frost patterns can indicate low charge or restrictions.
- Adjust thermostat setpoint and hysteresis to minimize compressor cycling
Power Budget and Battery Sizing
A 12V compressor fridge is impressively efficient once it reaches temperature. Here’s how to think about power:
- Pull-down (cooling from ambient to setpoint): The compressor runs at higher speed, drawing more current. Budget 4–6 amps for 30–90 minutes depending on box size and starting temperature.
- Steady state: The compressor cycles on/off or runs at minimum speed. Average draw is often 1–3 amps in moderate ambient temperatures.
- Daily energy: A well-insulated 40L box maintaining 4°C in 25°C ambient typically consumes 30–50Ah per day at 12V (360–600Wh).
Battery sizing rule: For overnight operation without charging, plan for at least 100Ah of usable capacity (that’s a 200Ah lead-acid or 100Ah lithium battery, since lithium gives you ~100% usable vs ~50% for lead-acid).
Pair with a 100–200W solar panel and a decent MPPT charge controller, and you’ve got indefinite off-grid fridge operation in reasonable sun.
What a 12V Compressor Fridge Is Good For — And What It’s Not
Ideal Applications
- Van and camper conversions: This is the sweet spot. Runs directly off the vehicle/house battery system, efficient enough for solar, quiet enough to sleep next to.
- Off-grid cabins: Paired with solar, this replaces propane fridges (which have their own safety and maintenance issues).
- Boats and marine: 12V is standard marine voltage. Compressor fridges handle the rocking better than absorption types.
- Overland vehicles: Vibration-tolerant by design (BLDC rotary compressors have no pistons to seize).
- Medical and scientific transport: When you need verified temperature maintenance during transport, a compressor system with thermostat logging is the standard.
Where It Falls Short
- Large volumes (150L+): A single 12V miniature compressor won’t cool a full-size fridge effectively. At that scale, consider a 24V or 48V unit, or a standard AC compressor with an inverter.
- Extreme ambient heat (50°C+): All refrigeration systems lose efficiency as ambient temperature rises. In extreme heat, the condenser can’t reject heat fast enough. RIGID compressors are rated to 52°C ambient, which covers nearly all real-world conditions — but in a sealed, unventilated space in the Sahara, performance will degrade.
- Zero electrical knowledge: If you’ve never wired a 12V circuit, this project will teach you — but start with smaller projects first. Mistakes with compressor wiring can damage expensive components.
- Quick weekend builds: If you want cold drinks by Saturday, buy a finished portable fridge. This build takes planning, parts sourcing, and patience (1–3 weekends for most people).
Common Mistakes and How to Avoid Them
After seeing hundreds of DIY fridge builds in forums and van life communities, here are the recurring issues:
- Insufficient insulation: The number one fail. People use 25mm foam and wonder why the compressor runs constantly. Minimum 50mm for fridge, 75mm+ for freezer.
- Poor condenser airflow: Mounting the condenser in an enclosed cabinet with no ventilation. It needs moving air. Always add a fan, always leave clearance.
- Undersized wiring: Voltage drop over long wire runs kills compressor performance. Use 12 AWG or thicker for runs over 2 meters. Calculate your voltage drop.
- No fuse: A short in the compressor wiring can start a fire in a vehicle. Always fuse the positive lead within 300mm of the battery.
- Kinking copper tubing: Use a tube bender. A kinked line is a blocked line — the whole system stops working.
- Ignoring the drain: Water accumulates inside a fridge. Without a drain, it pools, freezes on the evaporator (reducing efficiency), and eventually makes a mess. Add a small drain line with a one-way valve.
- Thermostat probe placement: Don’t mount it on the evaporator plate. Mount it in the air, mid-height, away from the walls. You want to measure air temperature, not plate temperature.
Final Thoughts
Building a 12V compressor fridge is one of the most satisfying van life or off-grid projects you can tackle. You end up with a fridge perfectly sized for your space, running exactly where you want it, at a fraction of the cost of premium commercial units — and with the deep satisfaction of understanding exactly how it works.
The key is starting with a good compressor module. A pre-charged BLDC unit with an integrated driver board takes the most intimidating parts of the build (refrigerant handling, motor control electronics) off your plate and lets you focus on the fun stuff: the box, the layout, the electrical integration.
Take your time with insulation and airflow. Get those right, and everything else follows.