
Your CO2 laser tube runs hot. Your 3D printer hotend cooling is inadequate for high-temperature filaments. Your CNC spindle overheats during long aluminum cuts. The aquarium pump and bucket of water you started with cannot maintain stable temperatures once ambient climbs above 25°C. You need a liquid chiller — but the industrial units cost $2,000+ and the cheap aquarium chillers lack the capacity or precision for your application.
This guide shows you how to build an effective liquid chiller using a compact DC compressor module. Not a thermoelectric toy that cannot hold temperature. A real vapor compression system sized for maker and small workshop applications.
Why Your Liquid Chiller Needs to Be a Compressor System
Before diving into the build, understand why simpler approaches fail for precision cooling:
Bucket of water + pump: Works until ambient temperature equals or exceeds your target temperature. A CO2 laser tube needs coolant at 15-22°C. If your workshop hits 30°C in summer, the water bucket reaches 28-30°C within an hour. The laser tube overheats, power drops, and eventually the tube fails prematurely. Water has thermal mass (it takes time to warm up), but zero ability to cool below ambient.
Thermoelectric (Peltier) chiller: Can cool below ambient, but with terrible efficiency. A 60W Peltier module consuming 60W of electricity produces maybe 20W of actual cooling at 10°C below ambient. At 15°C below ambient, useful cooling drops to near zero. For a laser requiring 200-500W of heat removal, you need a stack of Peltier modules drawing 600-1500W to accomplish what a compressor does with 150W input. The electricity cost alone makes it uneconomical.
Compressor-based chiller: A vapor compression system with COP 2.0-3.0 produces 2-3 watts of cooling for every watt of electricity consumed. A compact DC compressor module drawing 100W input delivers 200-300W of cooling capacity, easily holding coolant 15-20°C below ambient temperature. This is what commercial laser chillers use internally — the difference is you are building one for a fraction of the commercial price.
Sizing Your Liquid Chiller: How Much Cooling Do You Need?
The critical first step: calculate your thermal load. An undersized chiller runs continuously at maximum and still cannot hold temperature. An oversized chiller wastes money and space.
CO2 laser tubes: A 40W CO2 laser tube generates approximately 360W of waste heat (roughly 90% of electrical input becomes heat). An 80W tube generates about 700W. A 130W tube can generate 1,000-1,200W. Your chiller must handle this continuous heat load plus any ambient heat gain through the water lines and reservoir.
3D printer hotend cooling: Most hotend applications need 20-50W of cooling capacity — much less than lasers. A chiller for hotend cooling is more about temperature precision than raw capacity. Water cooling a hotend at 15°C provides consistent cold-side temperature regardless of ambient, enabling higher temperature gradients for printing engineering materials.
CNC spindle cooling: Depends on spindle power and cutting load. A 2.2kW spindle under heavy load generates 200-500W of heat that must be removed. Light engraving work might only generate 50-100W. Size for your typical heavy-use scenario.
Rule of thumb: Your chiller capacity should be 1.2-1.5× your calculated thermal load to provide headroom for ambient temperature variation and future upgrades. A 300W cooling capacity chiller handles most hobby CO2 lasers up to 60W tube power comfortably.
Components List for a DIY Liquid Chiller Build
Here is what you need for a liquid chiller capable of 200-500W cooling capacity:
Core cooling module:
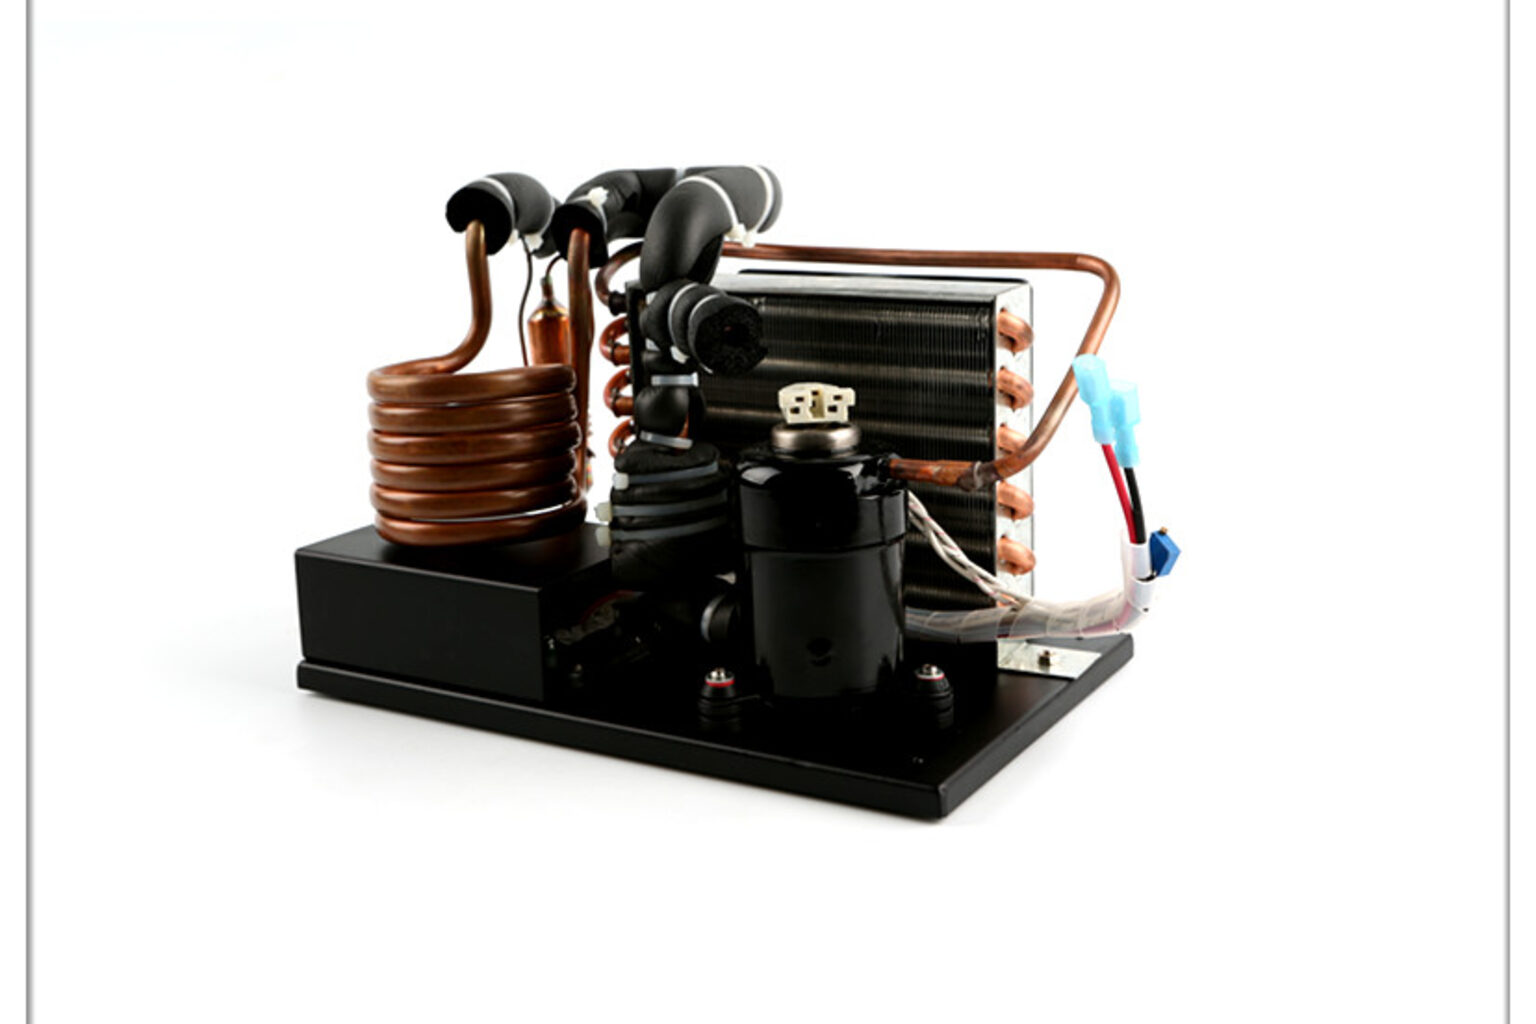
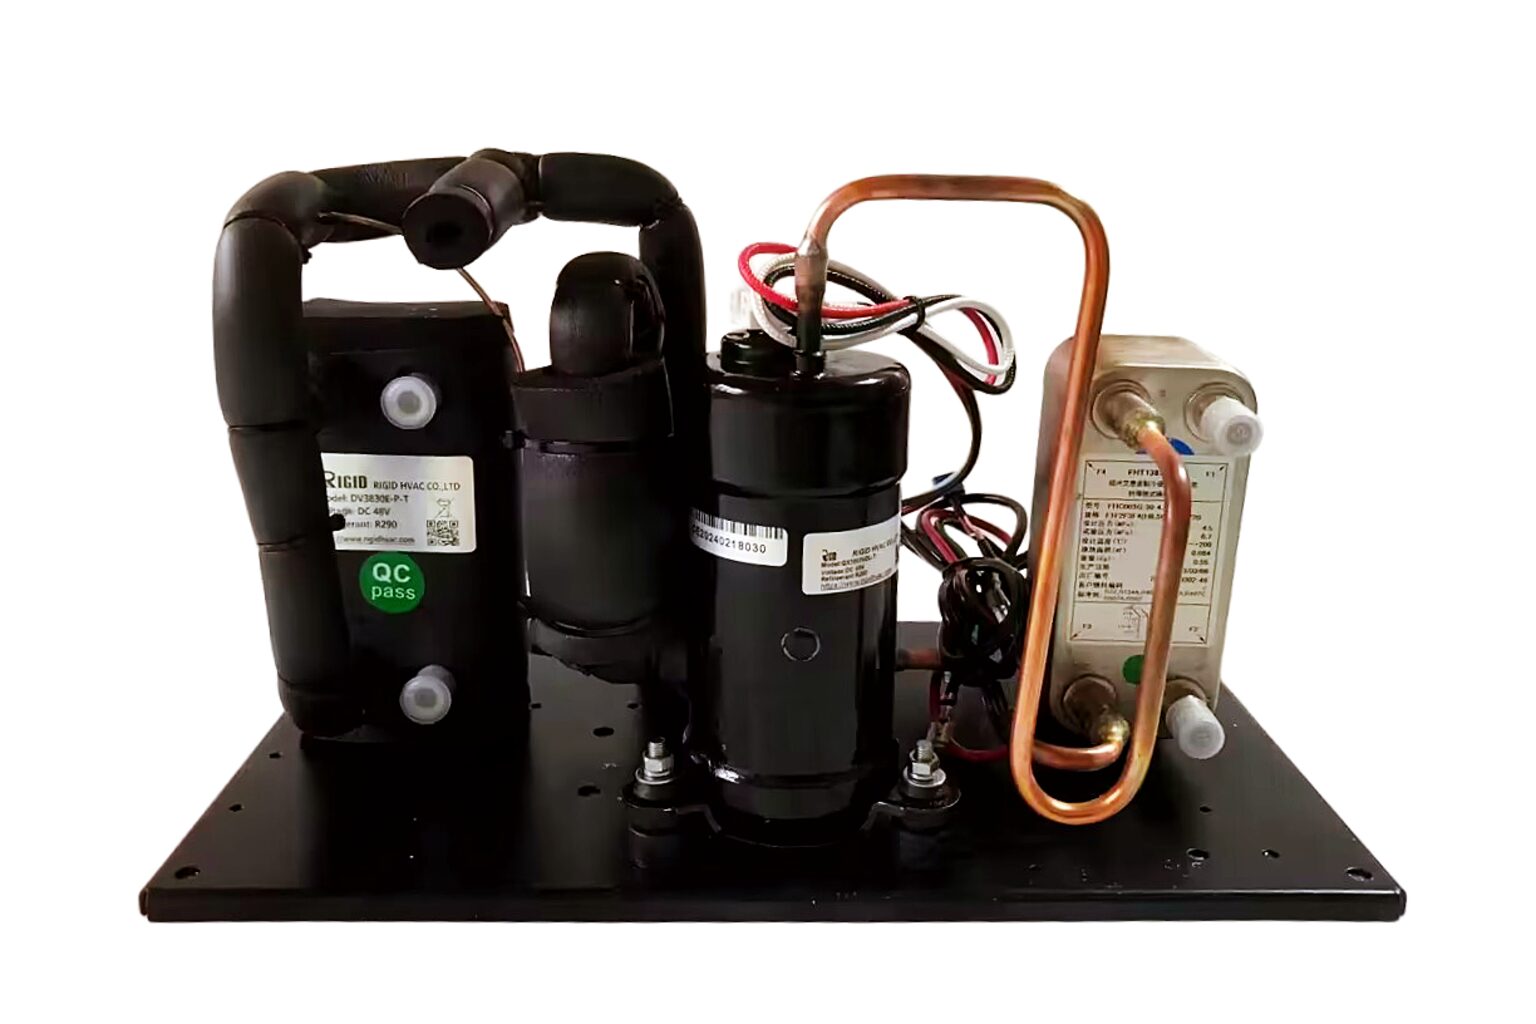
- DC compressor-based liquid chiller module (e.g., RIGID DV1920E-P plate chiller at 24V, or DV3220E-P for higher capacity) — the compressor, heat exchangers, and expansion device pre-assembled and pre-charged with refrigerant
- This eliminates the need for brazing, vacuum pulling, and refrigerant charging — the most difficult and equipment-intensive parts of building a refrigeration system
Fluid circuit:
- Water pump: 12V or 24V DC, 10-20 L/min flow rate, head pressure sufficient for your loop length. Brushless pumps for reliability.
- Reservoir: 2-5 liters depending on system thermal mass preference. Larger reservoir = more thermal buffer = slower temperature changes.
- Tubing: Silicone or vinyl, 8-12mm ID. Silicone is more temperature-stable and longer-lasting.
- Fittings: Barb fittings or quick-disconnect for easy maintenance
- Coolant: Distilled water with biocide additive, or premixed propylene glycol coolant (if operating below 5°C target)
Electrical:
- 24V DC power supply: 300-400W capacity for the compressor module + pump
- Temperature controller: Digital PID controller with relay output, or Arduino/ESP32 with relay module for custom control
- Temperature sensor: NTC thermistor or PT100 in the coolant return line
Enclosure and airflow:
- Fan for condenser airflow (if not included with the module): 120mm or 140mm, 12V
- Enclosure: optional but recommended to reduce noise and contain any potential leaks
Estimated total cost: $350-600 depending on component choices and whether you already have some parts. Compare to $800-2,500 for commercial laser chillers of equivalent capacity.
Assembly and Connection
The advantage of using a pre-assembled compressor chiller module: you do not need refrigeration tools or skills. The vapor compression circuit comes sealed and charged from the factory. Your job is connecting the fluid circuit and electrical system:
- Mount the chiller module in your enclosure or workspace location. Ensure adequate airflow around the condenser (air-cooled side). Leave at least 100mm clearance on the condenser air inlet and outlet.
- Connect the fluid loop. Route tubing from reservoir → pump → chiller module cold plate inlet → chiller module cold plate outlet → your equipment (laser tube water jacket, hotend cooling block, spindle housing) → back to reservoir. Ensure no kinks or high points where air can trap.
- Fill and bleed the system. Fill the reservoir with coolant. Run the pump with the chiller OFF until all air bubbles are purged from the loop. Top off the reservoir. Repeat until flow is bubble-free.
- Connect electrical. Wire the power supply to the chiller module controller, pump, and condenser fan. Connect the temperature sensor in the coolant return line (measures water temperature returning from your equipment — this is the temperature you want to control).
- Set the temperature controller. Target temperature depends on your application: CO2 laser tubes typically want 18-22°C, precision machining wants 20±1°C, 3D printer hotend cooling might target 15°C for maximum thermal gradient.
- Test and tune. Run the system and monitor coolant temperature over time. Verify the chiller can maintain setpoint with your equipment running at full load. Adjust control parameters if temperature oscillates excessively.
Performance Expectations and Limitations
What to expect from a properly built DIY liquid chiller:
- Temperature hold: ±1-2°C of setpoint with basic on/off control; ±0.5°C with PID control and variable-speed compressor
- Cooldown time: From ambient (25°C) to setpoint (18°C), expect 15-30 minutes depending on reservoir volume and chiller capacity
- Ambient capability: A 300W chiller maintains 18°C coolant with ambient up to approximately 35°C. At 40°C ambient, the achievable coolant temperature rises by 3-5°C.
- Noise: Variable-speed DC compressor at partial load: 35-42 dB. Comparable to a quiet desktop computer. The loudest component is typically the condenser fan, not the compressor.
- Power consumption: 80-150W average during steady-state operation (varies with thermal load and ambient). At idle (setpoint reached, minimal heat input), the compressor runs at minimum speed drawing 30-50W.
Common Build Mistakes to Avoid
From observing dozens of DIY chiller builds in maker communities:
- Insufficient condenser airflow. Stuffing the chiller module in a sealed box kills performance. The condenser needs fresh air supply and exhaust. If recirculating hot air, condensing pressure rises and cooling capacity drops 20-40%.
- Wrong pump sizing. Too little flow creates excessive temperature differential across your equipment (inlet vs outlet). Too much flow wastes pump energy and can cause erosion in small passages. Target 1-3°C temperature rise across the equipment at your expected heat load.
- No flow switch or alarm. If the pump fails or a hose pops off while the equipment is running, the equipment overheats with no warning. Install a flow switch or at minimum a high-temperature alarm on the equipment’s coolant circuit.
- Tap water instead of distilled. Minerals in tap water create scale deposits in small cooling passages over months. Use distilled or deionized water. Add biocide to prevent algae growth in the reservoir.
- Undersized reservoir. A tiny reservoir means rapid temperature swings when heat load changes. A larger reservoir (3-5L for most maker applications) provides thermal buffer that smooths out transients.
Choosing the Right Compressor Chiller Module
RIGID offers several pre-assembled liquid chiller modules suitable for this type of build:
- DV1920E-P (24V, plate heat exchanger): Compact, efficient, suitable for loads up to 250-300W cooling. Good for most hobby CO2 lasers up to 50W tube power.
- DV3220E-P (24V, plate heat exchanger): Higher capacity for 400-550W cooling. Handles 80W+ CO2 laser tubes and multi-device cooling loops.
- DV3820E-P (24V, plate heat exchanger): Maximum capacity in a compact format for 600-800W cooling. For heavy CNC spindles, high-power lasers, or multiple devices on one loop.
All modules come pre-charged with R134a refrigerant, include the BLDC compressor with variable-speed controller, and have standard fluid connections for easy integration. No refrigeration certification or special tools required for installation.
For complete specifications and ordering, visit the RIGID Compact Liquid Chiller product page.
Real Build Examples: What Makers Are Cooling
Concrete examples of successful DIY liquid chiller builds using DC compressor modules in maker workshops:
K40 CO2 laser (40W tube): A DV1920E-P module with 3-liter reservoir, small brushless pump (8 L/min), and basic PID controller. Total heat load approximately 350W. The chiller maintains 19°C coolant with ambient at 28°C, drawing 85W average. The entire system fits in a 300×250×200mm enclosure beside the laser. Total build cost including enclosure and all fittings: approximately $420.
 High-temperature 3D printer (heated chamber to 80°C): The cold-end extruder needs active cooling to prevent heat creep in the hot zone. A small chiller module maintains 15°C coolant flowing through a custom cooling block above the heat break. Only 30W thermal load, so the compressor runs at minimum speed most of the time. Nearly silent operation. Build cost: $350 (oversized for the load, but provides future expansion capacity).
2.2kW water-cooled CNC spindle: Under heavy aluminum cutting, spindle heat generation peaks at 400-500W. A DV3220E-P module with 5-liter reservoir and high-flow pump (15 L/min) handles the load. Temperature stability matters here because spindle bearing clearance changes with temperature — consistent coolant prevents dimensional drift during long programs. Build cost: $550 including flow meter and high-temperature alarm.
Fiber laser marker (20W optical, 200W waste heat): The laser source needs coolant at 22±1°C for optimal beam quality and wavelength stability. A plate chiller module with PID control maintains ±0.5°C stability. The critical requirement here is not capacity but precision — making variable-speed compressor modulation essential rather than on-off cycling. Build cost: $480.
Control Options: From Simple to Smart
The control system determines how well your chiller maintains temperature. Options from simplest to most capable:
Level 1 — On/off with hysteresis ($15-25): A digital temperature controller (like STC-1000 or similar) turns the compressor on when coolant exceeds setpoint + 1°C, off when below setpoint – 1°C. Simple, reliable, but creates ±1-2°C temperature swings. Adequate for most 3D printer and CO2 laser applications where ±2°C does not affect performance.
Level 2 — PID controller ($30-60): A proper PID controller with analog or relay output modulates the compressor speed (if using variable-speed DC compressor) for tighter control. Achieves ±0.5°C stability. Worth the upgrade for fiber lasers, precision machining, and any application where temperature stability affects product quality.
Level 3 — Microcontroller + custom firmware ($20-40 hardware): Arduino, ESP32, or Raspberry Pi Pico running custom PID code. Advantages: data logging, WiFi monitoring, custom alarm thresholds, integration with your CNC controller or 3D printer firmware. The programming investment is higher but provides exactly the behavior you want. Popular choice among makers who enjoy the software side of building.
Level 4 — PLC integration (variable): For workshop-scale installations where the chiller serves multiple machines, integration with existing PLC infrastructure allows centralized monitoring and control. The DC compressor module accepts standard 0-5V or PWM speed commands compatible with any PLC analog output module.
Maintenance and Long-Term Reliability
A properly built DIY liquid chiller requires minimal ongoing maintenance:
- Monthly: Check coolant level in reservoir. Top off if needed (evaporation loss is minimal in a closed system but some occurs at the reservoir surface).
- Every 3-6 months: Check coolant clarity. If cloudy or discolored, drain and refill with fresh distilled water + biocide. Clean or replace any inline filter.
- Annually: Clean condenser fins (dust accumulation reduces cooling capacity). Check all hose connections for seepage. Verify pump flow rate has not degraded.
- Every 2-3 years: Replace pump (brushless DC pumps have limited bearing life under continuous operation). Replace silicone tubing if hardened or discolored.
The compressor module itself is essentially maintenance-free — sealed refrigerant circuit, brushless motor, no oil changes. Expected compressor life: 50,000+ hours (over 5 years of continuous 24/7 operation).
For the full range of compact liquid chiller modules optimized for maker and OEM integration, see the RIGID Compact Liquid Chiller product page.